This section will show you how to create your first Aspen project. A simple Aspen project requires that you complete the Properties and Simulation tabs.
Open Your Project
On the start page when first opening Aspen will give you all the options for opening a project.
Recent Models will display all of your projects, showing the most recently opened project first. If you have never created a project, this pane will be blank.
Open can open a currently existing project. If you were just sent an Aspen project, use this to open it.
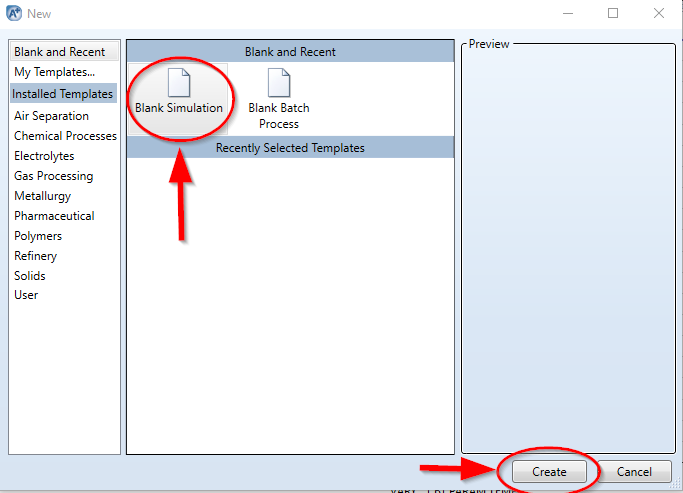
New will create a new project. In this tutorial, we will use this selection. Click this button.
Aspen will give multiple options for what type of project to create. If your process is specific to a certain process, it might be useful to use a template. However, most often, you want to create a blank simulation. Click on Blank Simulation and then click “Create”.
If you want to open more than one project at once, first open one of your projects and then select File in the top left to open a second one.
Saving Your Project
It is important to save your Aspen project often since Aspen tends to crash randomly. In the top left, click File → Save As. You generally want to save your project either as a compound file or a backup file.
A compound file saves all of the information from your project including external files (like Excel spreadsheets or Fortran files) and results from running the simulation. The one disadvantage of compound files is that they are generally very large files. If you had difficulty converging your project or received a lot of errors, it might be a good idea to save the compound file.
A backup file contains all of the input information for your project but no results, meaning that you will need to run your simulation whenever you open your project. I generally save my projects in backup files as long as the file runs easily to save disk space.
Properties Interface
Properties Entry
Components
Enter the compounds that are in your process by typing them into the Component ID column.
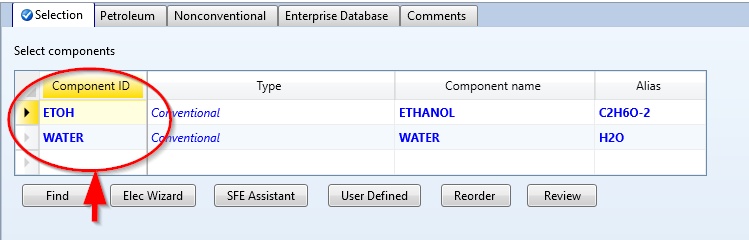
Aspen will recognize multiple names for the same compound - for example, I entered “ETOH” in the column ID and Aspen recognized it as “Ethanol” in the component name column. To make sure no errors occur, ensure that when you enter the component that the rest of the columns auto-fill. For this tutorial, I will be entering the components “Ethanol” and “Water”.
Let’s say that you aren’t sure that your component is the correct name. In this case, click the Find button below the component table. Here you can select from one of three options for search criteria:
- Begins with - will display all results for compounds that begin with the search entry.
- Contains - will display all results for compounds that contain the search entry - i.e. all compounds in Aspen’s database that contain “propane”.
- Equals - will display all results that exactly match the search entry. Use this if you want to ensure that Aspen is giving you the correct compound.
After you are finished entering components, either click on the Methods folder in the left navigation menu or click on Next Input in the top left.
Methods
The methods tab asks for what thermodynamic model you are using for your process. All that is required in this file is to select a Base Method from the drop-down menu. Common base methods to select are Ideal, NRTL, or UNIFAC. For this tutorial, I will enter NRTL.
If you cannot find the method that you need, try looking in the list under the Method Name drop-down menu.
Some methods require you to open the Binary Interaction tab to load the interactions from Aspen’s database. If you enter the method and get an error for required input incomplete, either click Next Input or navigate to Methods → Parameters → Binary Interaction and click to load the tab.
Run the Properties Pane
After you enter components and a base method, the properties tab should be ready to run. Click the Run button in the top left. Although it is unnecessary to run the properties pane before filling out the simulation, it is recommended to do so to ensure the simulation runs easier.
Next, click on the Simulation pane in the bottom left.
Simulation Interface
Simulation Entry
Main Flowsheet
The main flowsheet is where you will draw your process. The Model Palette menu at the bottom allows you to select many different types of chemical units, including Separators, Columns, Heat Exchangers, and Reactors. All of these units will have separate tutorials. For this tutorial, let’s say we are separating Ethanol and Water using a distillation column.
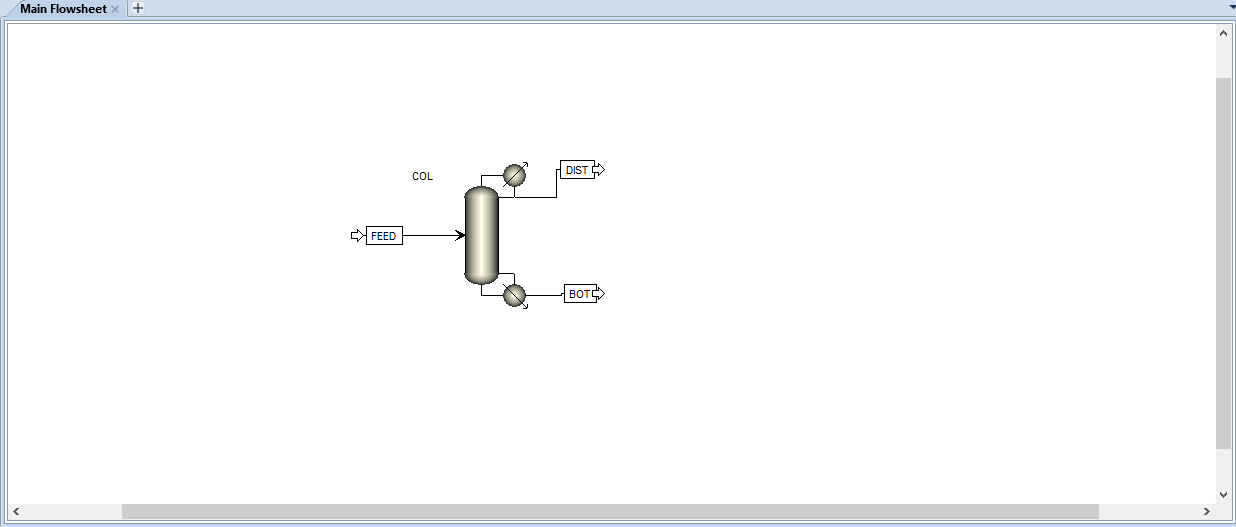
It is easier in Aspen to first place down all the blocks (or units) in your process and then specify the streams. Let’s start by placing down a distillation column. In the Model Palette, select Columns → RadFrac and then click in the white space to place the column. Your cursor is now bound to placing RadFrac’s on the white space - to change this, select the mouse cursor in the Model Palette menu.
Your block is automatically named “B1” in Aspen, which might be confusing to read. To rename your column, right-click the column and select Rename Block. Then enter the name. In this tutorial, I will name the RadFrac “COL”.
With your blocks placed, next is to add the flow streams to the block. In Model Palette, select Material at the far left. Click to the left of the RadFrac and then click on the red arrow to the left of the column. This will be your feed stream. To rename it, select the stream name in the flowsheet, then select Rename Stream to “FEED”.
Next, we need to specify output streams. If you hover over the red arrows out of the RadFrac, you can see what the red arrows are specifying. At the top of the RadFrac, let’s create a Liquid Distillate stream (the stream below the heat exchanger near the reflux) and a Bottoms stream. Name your streams “DIST” and “BOT” respectfully.
At this point, your flowsheet should look like this:
Your main flowsheet should be complete. Next, navigate to Streams through the left navigation menu or Next Input.
Streams
Aspen requires that you specify the conditions of the feed streams. Aspen requires data at least for every input stream that is not the output of a previous block. For this tutorial, the only stream that must be specified is the “FEED” stream.
To specify this stream, either select Next Input or Streams → FEED. The following window should appear:
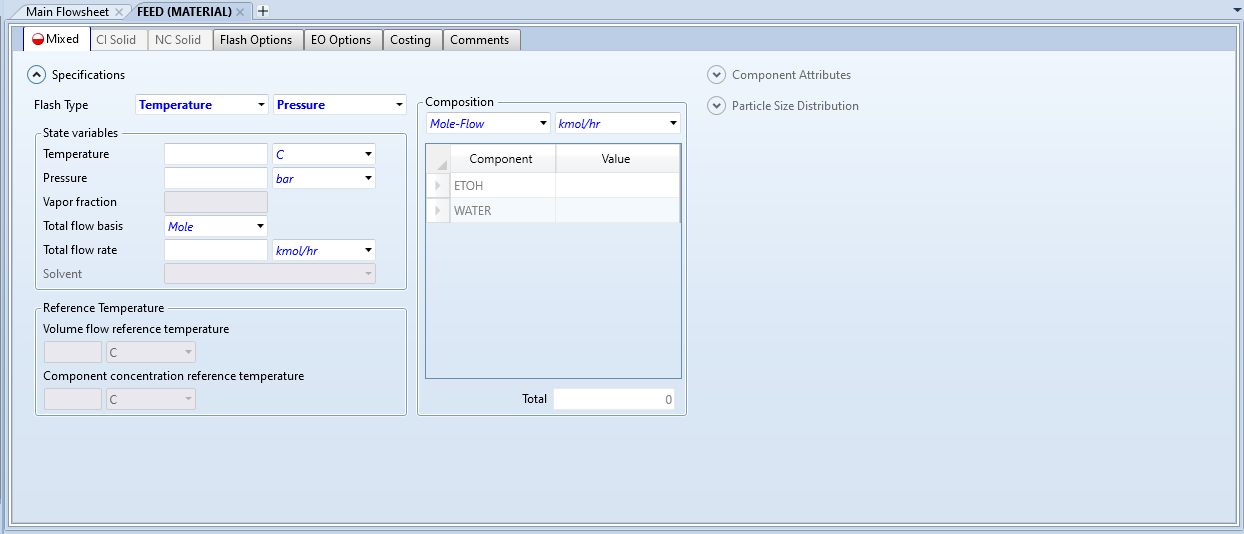
Aspen requires two of the three properties to be specified in the Flash Type:
- Temperature
- Pressure
- Vapor Fraction (0 if pure liquid, 1 if pure vapor)
Let’s specify the temperature and pressure. Under State Variables, in the temperature tab, specify 100 °C for temperature and 10 bar for pressure.
Aspen also requires how much of the feed is flowing in. This can be accomplished by either specifying:
- The total flow rate and the composition
- The flow rate by each component
Let’s specify the total flow rate first. Enter 100 kmol/hr in the Total Flow Rate entry.
Next, let’s specify how much of each component is flowing in. This can either be accomplished by specifying how much is flowing in of each component as an amount or as a percentage of the total feed. Let’s specify the feed composition as a mole fraction. In the Composition tab, change Mole-Flow to Mole-Frac. Then in the table, enter 0.5 for the value of both ethanol and water in the feed stream.
The required input for Streams should be complete. Next, navigate to Blocks → COL or click Next Input.
Blocks
The Blocks column will differ depending on what blocks you specify in the main flowsheet. In this tutorial, the only block specified was the “COL” block, which corresponds to the “RadFrac” block.
The RadFrac column requires that you specify:
- The number of stages in the column
- The type of condenser
- The operating specifications
There are many possible operating specifications that are best described in the distillation column section of this tutorial. For now, let’s select:
- Reflux Ratio
- Distillate to Feed Ratio
Give these specifications values of 1 and 0.5, respectfully.
This completes the Configuration tab. Click Next Input or select Streams at the top of the main window.
The Streams tab requires that you specify at what stage the feed stream enters the distillation column. For now, let’s say that it enters exactly at the middle of the column, or stage 5.
Next, hit Next Input or select Pressure.
The Pressure tab requires you to specify what pressure the condenser operates at. Enter 10 bar for this pressure.
Run the Simulation Pane
At this point, all specifications should be complete to run the simulation! Click the Run button in the top left. If everything was entered correctly, you should see “Results Available” in the bottom left.

In case your simulation ran with errors, navigate to Results Summary → Run Status or simply hit “Ok” at the pop-up when your simulation receives an error. Aspen will give you messages that will show what went wrong in the simulation.
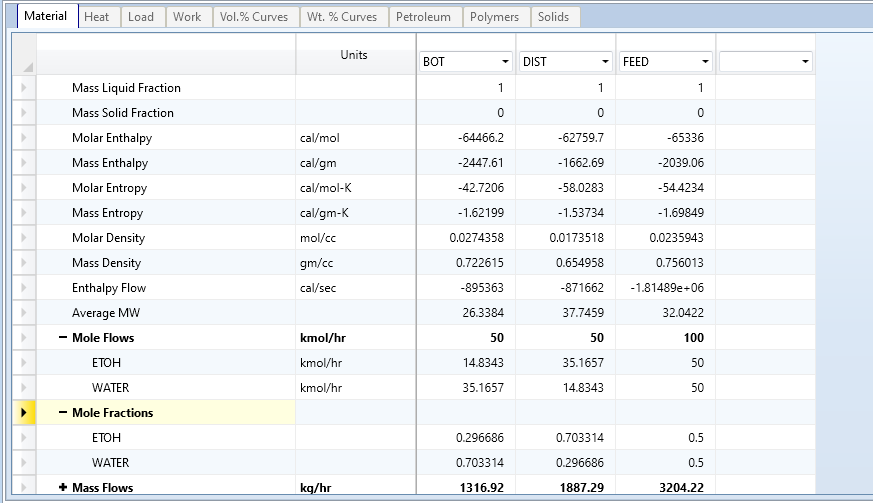
To see your results, navigate to Results Summary → Streams. The column in this menu will display all of the data calculated for each stream in the process. For this tutorial, my results look like this:
Let’s say you want to see what the resulting specifications are for the column block (or “COL” in this tutorial). In this case, navigate to Blocks. Look at Results to see specifications for the block itself, Profiles to see results for each stage in the column, and Stream Results to see the streams that are related to the block you are looking at. In this case, the stream results should look the same as the stream results in the Results Summary file since there is only one block in our simulation.
Next Steps
Congratulations on finishing your first Aspen project! For learning more, see how to implement Model Analysis Tools for optimizing your process, or navigate through the left navigation pane.